How to Fix Stuttering Caused by VRAM Limitations
Introduction
Game stuttering can make an otherwise fast graphics card feel inconsistent. When a game needs more local graphics memory than is comfortably available, it may need to stream or move resources more frequently. That can contribute to pauses or uneven frame delivery. But stutter has many possible causes, including shader compilation, CPU bottlenecks, storage latency, driver problems, thermal limits, and background activity. A good fix starts by testing whether VRAM is actually involved.
A graphics memory problem should be diagnosed from evidence rather than guessed from one monitoring number. The operating system, driver, application, and monitoring utility may describe memory in different ways. Some tools show dedicated allocation, some show a process's usage, and others expose a budget or shared-memory value. Those figures can be useful, but they do not all mean that the GPU has run out of physical memory.
| Symptom | Points to |
|---|---|
| Texture pop-in or delayed asset loading | Possible VRAM-related sign |
| Repeated hitches when entering a new area | Possible VRAM-related sign |
| Problem gets worse at higher texture settings | Possible VRAM-related sign |
| Hitch only on the first pass | More likely shader compilation or asset caching |
| Stutter with modest VRAM use | Check CPU, storage, driver overhead, or background activity |
Quick answer
Lower texture quality or disable optional high-resolution assets as a controlled test, then compare frame-time behavior. If the symptom remains, investigate CPU, storage, shaders, drivers, and system stability.
Understand the symptom before changing settings
Write down what happens, when it happens, and whether it can be reproduced. Does the problem occur at startup, when loading a level, after several minutes, when opening a large project, or only at a particular setting? Does the application close, display an error, freeze, or continue with reduced performance? The timing often narrows the possible causes.
Record the exact GPU, driver, application version, operating system, system RAM, and workload settings. If the problem began after an update, note that date and version. Keep a copy of any error message. Avoid changing several driver and registry settings at once, because doing so makes it difficult to identify the cause and may create a second problem.
Recognize possible memory-related symptoms
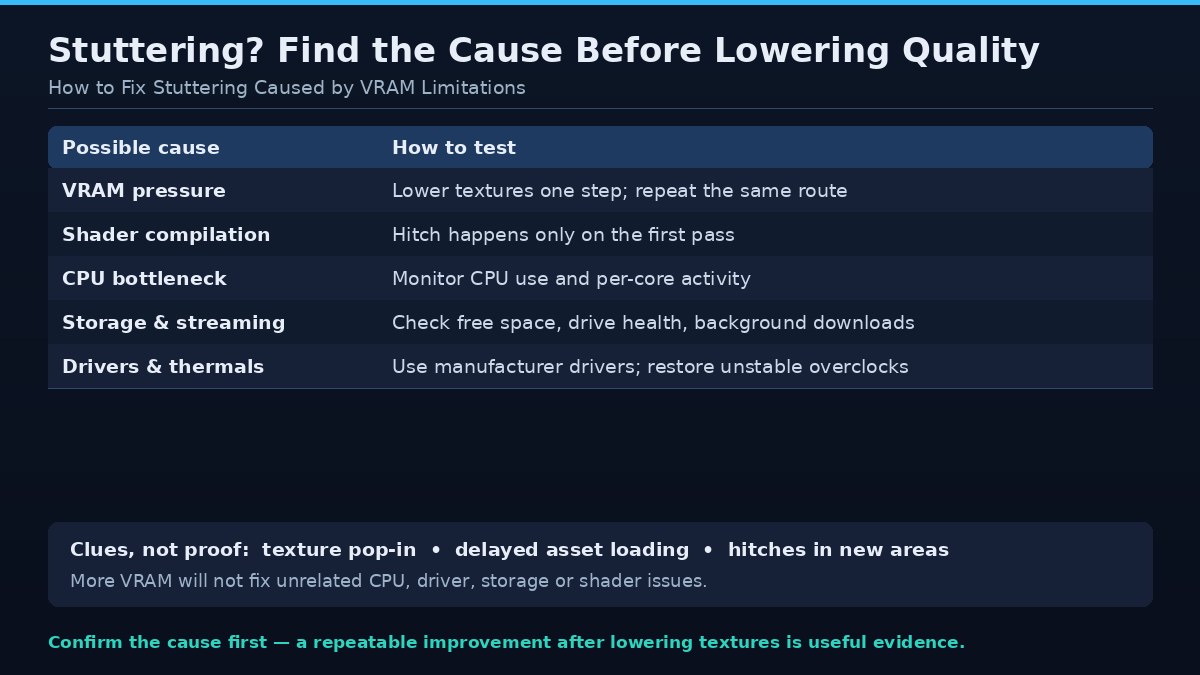
Possible signs include texture pop-in, delayed asset loading, repeated hitches when entering a new area, or a problem that becomes worse at higher texture settings. These are clues, not proof. The game engine may have a streaming issue, or storage and CPU limitations may create similar symptoms.
Measure frame-time behavior
Use a reputable capture tool to record frame times during a repeatable route. Average FPS can hide brief interruptions. Note the location and time of each spike, and compare multiple runs. A hitch that occurs only on the first pass may be related to shader compilation or asset caching rather than a persistent capacity limit.
Test texture quality
Lower texture quality one step while leaving other options unchanged. Repeat the same route and observe whether the hitch pattern changes. If the problem improves consistently, memory pressure becomes a more plausible explanation. If it does not, restore the original setting and test another cause rather than continuing to reduce image quality.
Check resolution and advanced effects
Resolution affects pixel-related buffers and overall GPU workload. Ray tracing and high-resolution shadows can add additional resources and compute demand. Test these settings individually. Upscaling may reduce internal rendering resolution, but it is not a guaranteed solution to texture memory pressure.
Investigate storage and asset streaming
Games may load textures and geometry from storage as the player moves through a world. A slow or busy storage device, background file activity, or an engine streaming issue can cause delays. Check free disk space, drive health, and background downloads. Avoid moving active game files while the launcher is running.
Rule out CPU and shader compilation
Monitor CPU utilization and per-core activity where possible. A CPU bottleneck can create poor frame pacing even when GPU memory is available. Some games compile shaders during play, which can cause temporary stutter. Check whether the issue repeats after the shader cache has been populated and whether a game update addresses it.
Driver, thermal, and background checks
Install drivers from the GPU manufacturer's official source and review relevant release notes. Check GPU and CPU temperatures, clocks, and power behavior. Restore unstable overclocks to default settings. Close unnecessary overlays, recording software, and GPU-accelerated applications, then retest.
A reliable final verification
After finding a setting that appears to help, repeat the same scene several times and compare frame-time captures. Check that the improvement is not caused by a different route or background task. Record the original and final settings so the result can be reproduced. If the problem persists across several games, investigate system stability and hardware more broadly.
Safe troubleshooting sequence
Begin with reversible application-level changes. Save work, close unnecessary GPU-accelerated applications, and restart the affected program. Check whether an official update addresses the issue. If you change a graphics option, record the original value and test one option at a time. If the application offers a lower-memory mode, smaller texture setting, reduced batch size, or project optimization option, use the documented control rather than an unofficial patch.
Next, inspect system conditions. Check GPU temperature, power behavior, system memory pressure, storage availability, and background processes. A system can appear to have a VRAM problem when the actual cause is a driver reset, overheating, unstable overclock, insufficient system RAM, or a damaged application cache. Restore factory GPU clocks if the card is overclocked and test stability before making further changes.
If the problem persists, collect logs and reproduce it with the smallest possible workload. Compare a new project or clean game profile with the original one. If the clean workload works, the issue may relate to a particular asset, configuration, plugin, or save. If all workloads fail, investigate the driver, operating system, and hardware more broadly. Use official support channels for driver cleanup or firmware procedures.
What not to do
Do not download unknown executables advertised as VRAM expanders, memory cleaners, or guaranteed stutter fixes. Software cannot increase the physical dedicated memory installed on a discrete GPU. Avoid registry edits copied without a clear explanation, disabling security services, or flashing unofficial firmware. These steps can destabilize a system and make diagnosis harder.
Do not assume that a higher memory allocation is itself a fault. Some applications reserve memory for caching. Do not publish a benchmark claim from a single run or infer a hardware defect from one crash. Verify the issue, preserve logs, and distinguish observed facts from possible explanations.
Frequently asked questions
Does low VRAM cause stuttering?
It can contribute when a workload exceeds the practical memory budget, but stutter also comes from CPU, storage, shaders, drivers, and other factors.
Should I lower textures to fix stutter?
It is a useful diagnostic test. Change texture quality alone and repeat the same scene to see whether the symptom changes.
Can an SSD fix VRAM stutter?
Faster storage can help asset loading in some situations, but it cannot increase dedicated VRAM or fix every memory bottleneck.
Why does stutter happen only when entering a new area?
The game may be streaming assets, compiling shaders, or loading data. Monitor storage, CPU, frame times, and memory to narrow the cause.
Will more VRAM eliminate all stutter?
No. Stutter can have many causes, and a larger memory capacity will not fix unrelated CPU, driver, storage, or shader issues.
Conclusion
Confirm the cause before buying hardware. A repeatable improvement after lowering texture quality is useful evidence, but a full diagnosis should consider the whole PC.
A methodical approach is safer and more effective than applying a collection of unrelated tweaks. Identify the symptom, capture the configuration, change one variable at a time, and confirm that the result is repeatable. If the issue appears to be hardware-related or involves repeated driver resets, use manufacturer diagnostics or qualified repair support rather than risking the system with undocumented fixes.